Yesterday I came across A Decent WordPress Deploy Workflow by Arnaud Sellenet based on WP-CLI, a command line interface for WordPress which I also only discovered yesterday. It is already pretty impressive what you can to with WP-CLI’s standard commands, but Arnaud created one of many other community commands called wp-deploy-flow. The big picture of this deploy command in his own words is as follows:
- No more FTP bullshit or manual syncing headache, only dead simple command-line.
- As many environments as you need
- Want to deploy to staging, simple as that :
wp deploy push staging - Want to get a local copy from the production website :
wp deploy pull prod
Although very impressive, this won’t work at Openstream, because we have a combination of hardliners working on the command line and those more comfortable using a git client and other graphical user interfaces. For junior or new developers there’s also a code review before the code will be pushed to the live site. That’s why we prefer them to work on a fork instead of the master repository and use various native git commands which are also available in any git client. So there’s no need to ever go to the command line if you don’t want to.
Here’s how it works for us.
- Fork Repository on Bitbucket, Github or any other git code repository
- Clone forked repository on your local machine
- Commit and push your local changes to your forked repository
- Create a pull request on Bitbucket or Github to be reviewed and deployed
And here are the details.
1. Fork Repository
Go to the corresponding repository and fork the repository. On BitBucket it looks like this:
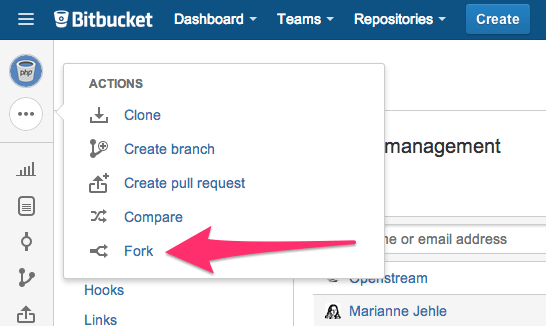
Then click the «Fork repository» button on the next page.
You now have a new repository URI that can be used to clone your fork or if you’re using SourceTree as git client you can just search for the forked repository name from within the SourcTree user interface as described in the next step.
2. Clone Fork
Now clone your forked repository on your local machine on the command line or with the git client of your choice directly into your local MAMP or XAMPP installation.
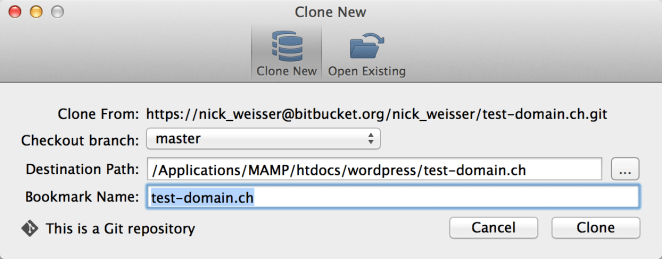
Now create a local database and import a dump of the live project into it either with the mysql utility on the command line or with your local phpMyAdmin installation which is usually part of every MAMP or XAMPP installation. The cloned repository usually does not contain a wp-config.php file (if there is one, just delete it and make sure you won’t commit it), which enables you to (re-)create it by running the WordPress installer from your browser. Go to http://localhost:8888/wordpress/test-domain.ch (domain, port and path may differ depending on your environment) and enter the necessary database credentials. Submitting the form in the first step of the WordPress installer will create a new wp-config.php which allows your local WordPress installation to connect to your local database.
Important: Do not continue with the next step of the installer as it will import the sample data which you don’t want. It makes more sense to work with the original data of the installation unless you’re starting from scratch anyway. In this case you can just use the default database and don’t have to go through the rest of «Clone Fork» section.
Now open your wp-config.php and add the following two lines at around line 34, i.e. after the DB_COLLATE constant.
define('WP_SITEURL', 'http://localhost:8888/wordpress/test-domain.ch');
define('WP_HOME', 'http://localhost:8888/wordpress/test-domain.ch');
This will make sure that you don’t have to search and replace the site URLs in your local live site database.
Now your WordPress backend should work locally. To make sure that the frontend is working, too, go to your permalink settings and change it to the standard format, i.e. http://localhost:8888/wordpress/test-domain.ch/?p=123. Now you should be able to navigate all of the pages of your live site locally. If there are links inside the content it might redirect you to the live site, because those links are stored as absolute URLs (including site URL) in the database.
3. Commit/Push Changes
You’re now ready to install new plugins locally, modify your theme or do whatever changes are necessary. Please keep in mind that this development workflow does not sync your database changes, so if you change any configuration settings, they are not reflected automatically on the live site. If you have experience with Magento, you might know that there’s a concept called database update script which can take care of this part. I haven’t tried to apply this principle to WordPress yet, but that’s probably the next thing to address. If you have any experience in this regard, please feel free to comment below.
So once you have tested your changes locally, commit them to your local repository with a commit message that contains the corresponding JIRA task ID and a German or English commit message that summarize your changes. You don’t have to mention the file names you changed or state any obvious stuff that is of no value. Here are a couple of examples for good commit messages.
- JT-342 Ported Facebook event lister from old to new Enfold child theme
- JT-321: Captcha Plugin upgrade to v3.9.5
- JT-146: Show deprecated forums grayed-out on forum overview page
Here are some bad examples of commit messages that are practically useless, because they are not specific enough.
- JT-123 Conflict resolved
- JT-211 Product info
- JT-411 Category listing
4. Create Pull Request
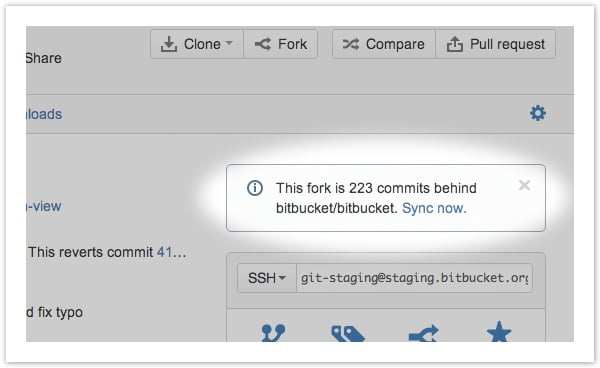
Once you’ve pushed your changes to your fork, go to Bitbucket (or the repo used for the project) and create a pull request. Once the pull request has been approved it will be merged into the master branch and then deployed to the live site. If you come back to that project later on, please make sure to keep up to date with the upstream repository. Bitbucket informs you when your fork is behind, and you get the option to instantly merge in those upstream changes with a single click.
That’s it for the first version of this article. As we’re constantly trying to improve our development workflow this procedure is likely to change. If you want to share your own development workflow, please share it in your blog and link to it in the comments below.